This is a totally unglamorous and yawn-inducing post to anyone neither interested in gardening nor food, so philistines falling laxly into either category are excused and can go back to fondling their piercings (noticed how many fresh lip hoops there are lately? Is there a 1994 wormhole out there?) and sending nudie selfies to randoms.
We've been growing our own garlic for about 6 years now, favouring a local heritage Printanor-type pink skinned variety, yes in part because of the wank value but mostly because of its superior taste and resistance to things like rust, since we don't spray or much bother with strenuous shit like active cultivation. These plants will have to pretty much look after themselves once we've done them the tremendous favour of sticking them in dirt, so if you're lazy or organically inclined, we advise you ask around about tried and true varieties in your area. Don't rule out modern strains if you've heard good things, though.
We've been growing our own garlic for about 6 years now, favouring a local heritage Printanor-type pink skinned variety, yes in part because of the wank value but mostly because of its superior taste and resistance to things like rust, since we don't spray or much bother with strenuous shit like active cultivation. These plants will have to pretty much look after themselves once we've done them the tremendous favour of sticking them in dirt, so if you're lazy or organically inclined, we advise you ask around about tried and true varieties in your area. Don't rule out modern strains if you've heard good things, though.
Growing garlic can be both stupidly simple and frustratingly arcane. In a good year (whatever that means- we're still scratching our heads) you'll get masses of great fist-sized bulbs with little to no effort; in less propitious seasons you'll end up with pissy little plants that expend what energy they've stored cheating you with their sneaky, snaky flower stalks. Up til now I've always planted in autumn, following the advice of several online garlic gardens, but that's gotten me two years of early flowering and diminishing returns, so this time we're going with tradition and setting out the cloves in the end of June, just after the (southern hemisphere) winter solstice. Garlic is easy to grow but primo bulbs are apparently dependent on all kinds of temperature and moisture constraints. From what I can gather, a good fat set seems to require a cool winter and spring and a hot, dry summer, especially around harvest. In our zone 9 maritime conditions, one season can extend a long way into another and rain is guaranteed, so we're probably suboptimal; my onions are often mediocre too. Oh well- the Allium family is fundamental to our food chain and the commercial crop tends to be quite heavily sprayed, so ho-hum home-grown is better than nothing.
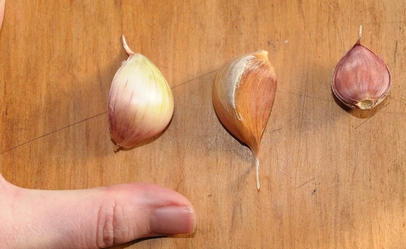
Anyways. What you're seeing to the right here are examples of the garlic I'm about to plant (L 2 R) nice big Printanor clove from my mother's garden, a robust brownish-papered variety from a friend's crop (thanks Jared) and one of my own crappy little cloves from the last harvest. Choose the fattest cloves from the outside of your bulbs, avoiding any that are fungal, holed, budding weirdly or bruised. Some peeps peel theirs but I don't think this makes a difference to strike or yield. I've often wondered if clove size really does matter, so I'll be keeping an eye on this crop with that in mind.
Anyways. What you're seeing to the right here are examples of the garlic I'm about to plant (L 2 R) nice big Printanor clove from my mother's garden, a robust brownish-papered variety from a friend's crop (thanks Jared) and one of my own crappy little cloves from the last harvest. Choose the fattest cloves from the outside of your bulbs, avoiding any that are fungal, holed, budding weirdly or bruised. Some peeps peel theirs but I don't think this makes a difference to strike or yield. I've often wondered if clove size really does matter, so I'll be keeping an eye on this crop with that in mind.
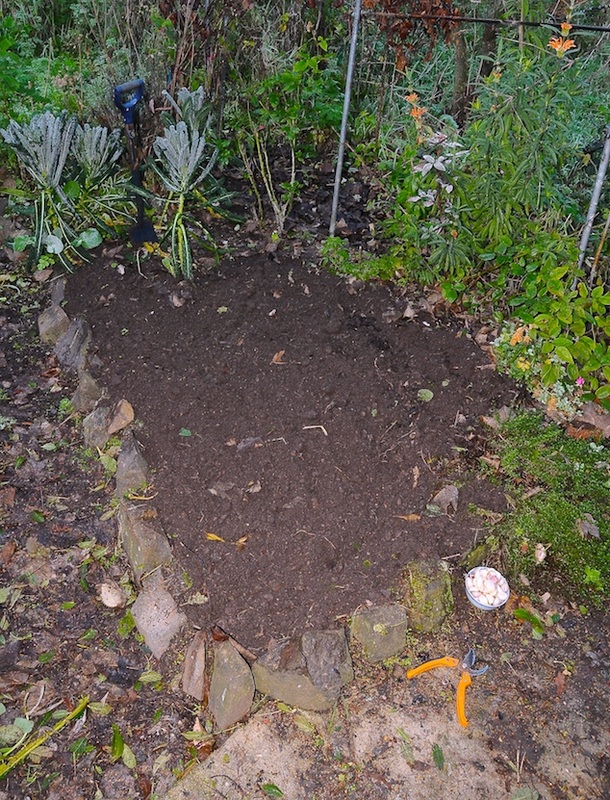 | < Here's part of our messy, neglected midwinter vege garden. It's growing Cavalo Nero kale and not much else. The soil is pretty good here, about 30cm deep, raised, well aired and enjoys all day sun. This is the kind of position you'll need for healthy garlic plants.  |
ABOVE I know it's boring, but do dig it over well before you plant. The garlic will get a much better start. I'm not adding fertiliser at this point since this is nice dirt and I prefer to wait till the plants are in active growth before feeding them. I'll use a few handfuls of sheep poo and some blood and bone, scattered between the plants as soon as the green tops start showing. Don't let the fert touch the sides of the new plants or the stalks might burn/rot out.
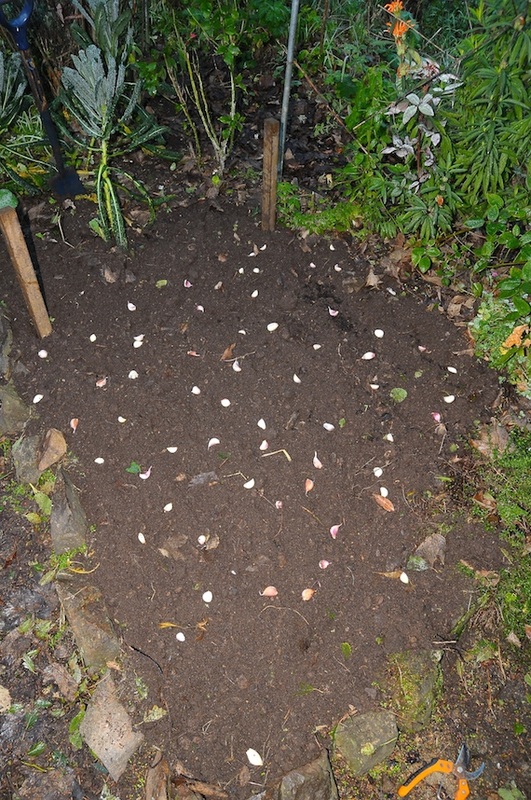 | < How much space do you need? Spread you fingers to their widest extent; each clove will need about this much hand room of its very own. You don't have to do pedantic rows and garlic takes up less space per plant than many vegetables, but don't overcrowd- you'll just end up with wimpy unproductive plants. I pay out the cloves onto the ground in very rough order to work out how much bed I'm going to need- it's as good a method as any. This is about 80 cloves and they ended up, once planted, needing about a meter and a half square. You could plant a little tighter in a pinch, and quite a bit wider if you're after competition garlic. BELOW RIGHT Always remember to plant the cloves with their basal plate (the bit where the roots come out) downwards in the soil; i.e. with the pointy end upward. Your soil should be tilled enough for you to be able to push them in gently, so if you're squishing or forcing the cloves down, that's a fail. There are as many theories about planting depth as there are gardeners, but we prefer to just cover them with a light sprinkle of soil so that they're barely hidden from view. I don't think it's crucial, so don't panic if you've gone a little deeper. |
| BELOW Once the cloves are tucked away, it's time to stake out and cover the plot. Garlic can take a while to emerge and weeds can obscure the baby plants, so mark out the bounds of the crop with sticks or stakes. When the leaves start to show, fert it and mulch it; we'll use browned-off pine needles for this because they're free and local. Do not forget to cover the plot with something or the birds will come sailing down as soon as your back's turned and trash all your hard work looking for worms. Every time. 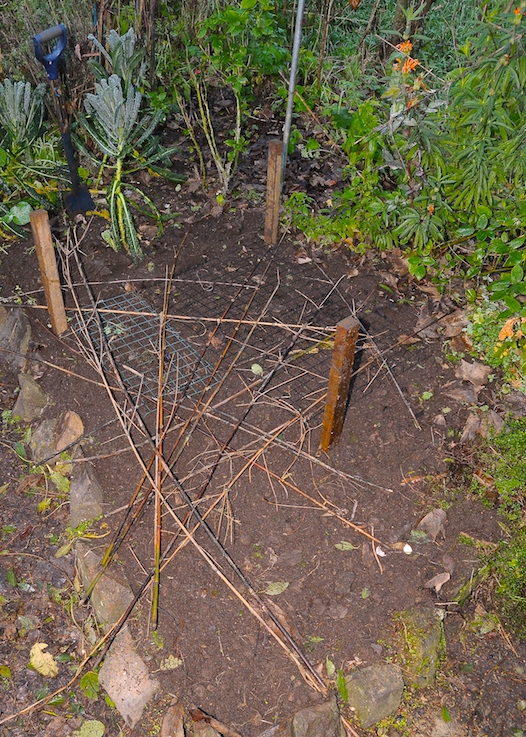 |  < We chucked a few greenhouse shelves and idle bamboo canes over it to foil the blackbirds, which is lazy and unsightly but perfectly effective. Any netting or substance that will let light through and discourage digging will be fine. Okay! You've planted garlic! Now sit back and wait. You should see strap-like, upright leaves in a month or two from now. Keep them watered and weeded and you'll end up with a whole lot of pungent deliciousness come midsummer. I'll be posting more practical, non-aspirational (lol) gardening tips from spring onwards and will update this crop for the benefit of constant readers, so please stay tuned. |
 RSS Feed